 Difficulty: Hard
Tactical Sense Requirement (approx.):
- Minimum: 300
- Half-shield: 500
- Broken-shield: 700
Boss:
Wise Latanu (501m, 80 bars)

Preferred Composition:
- 2 Knights
- 1 LightBinder (must have)
- 3 Alchemists
- 4 Damage dealers (berserker’s are highly recommended)
Summary:
This fight is long and the adds hit very hard. The best way we have done this is to have two sacrifices when the time comes. With this strategy you are going to max DPS and finish the fight with most people up as long as your LightBinder can time his Blessing of Tenacity correctly which isn’t an easy task to do as I will explain later on. This fight is highly reliant on breaking sheilds so make sure you have Berserker’s or very high Kinetics to break the shields.
The Fight:
For this fight you will want to split your team into two groups. One group will have a Knight, two Alchemist’s, and two damage dealers preferably Berserker’s; lets call this group one. Your second group lets call them group two will consist of a Knight, a LightBinder who can also turn into a berserker, an Alchemist and two damage dealers once again preferably Berserker’s. Group one will start on the inside and group two will start on the outside in the same spot that you fought the first boss in A1.
Group 1
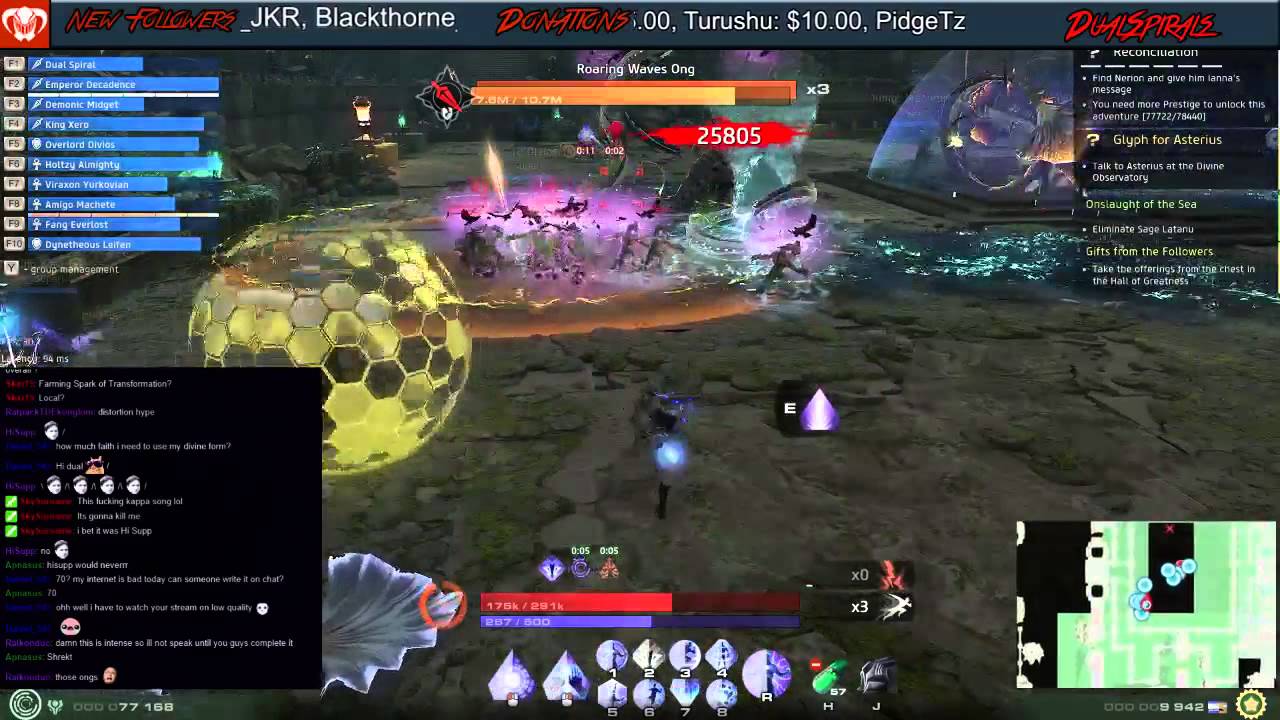
Group one will start by standing on the portals around the dome (see pictures for what portals look like). The fight will not start until group 1 is inside the dome so you have time to get started and positioned correctly. Once inside the dome it is normal tank-and-spank the only thing you have to worry about is throwing orbs out to the people outside which should be left to the support people. The boss doesn’t hit hard so the tank should have no problem staying alive. Depending on the other group’s DPS you will get 1 or 2 god orbs thrown into your dome. Once the god orb spawns your dome will shrink to about half the radius it previously was. During this faze you will want your Berserker or Kinetic to grab the orb and break the shield that is surrounding the boss. This will have to be relatively quick as the adds outside hit harder if the shield is up. Once the shield is down continue to DPS the boss until the god form wears out (approx. 3 mins). If you receive another god orb (you shouldn’t if group 2 did it correctly) let the second DPS get it as you cannot take two orbs in a row.
After a little bit of time your group and the other group will get switched so now you will be on the outside and the other group will be in the dome. While outside there should be a 4 bar white mob with only 1 bar of health left. You must focus that mob first as it is what spawns the god orb upon its death. You have to throw that god orb into the dome so the inside team can break the shield. When the shield is up 3 Naga mobs will spawn one or two of them will throw water under your feet so be careful to watch where you are standing as it will kill you if you aren’t paying attention. Once the shield is broken on the inside the god will then portal to the outside to help you with clearing mobs and will now be part of your group. Make sure you are picking up health orbs that the inside people are throwing out as they heal a lot; they do a DOT heal for about 50% of your health depending on your class. After the Naga’s are dead another 4 bar add will spawn and you have to kill him to spawn another god orb and throw it into the dome again. Once again the god will come outside and help you kill the adds once the shield is gone and he will be a part of your group now. This time there might be an Ong (serpent mob) that will spin in a circle; DO NOT get caught in that as before you can react it will kill you. Focus the Ong down and wait for another 4 bar mob to spawn. Throw the god orb in and this time the LightBinder will get it and turn into a Berserker or Kinetic to break the shield which means it will take more time to break the shield so be careful when fighting the mobs as they will hit hard. The Berserker/Kinetic will then come to you and will immediately turn back into a LightBinder as he is critical for the next phase. Once the LightBinder is out you can use the support god ultimate to kill the Ong or just run around cause shortly after that you will be switched with the two remaining people on the inside and this is where you will spend the rest of your time until the second phase.
Once you get switched with the two people inside the dome you will have to DPS the boss until phase two hits. The only thing you have to be worried about is getting the god orb that the two people outside hopefully live long enough to throw inside to you. Once it is thrown in another damage dealer can get it and break the shield; that damage dealer will stay inside and DPS the boss down. After approximately 9 minutes the dome will disappear and you will begin phase 2 (see below).
Group 2
Group 2 is the harder of the two groups and will need your attention the most. You will start at the same spot that you tanked the first boss in A1. Mobs will start to spawn to the left and right of you and it s up to the tank and LightBinder (using Quazar) to gather them up so the damage dealers can kill them. After you have killed the first 2 or 3 waves of mobs a god orb will spawn with 3 mobs around it; make sure you throw that into the people on the inside as they will have a shield to break and the mobs hit harder while the shield is up. When the shield is up Naga’s will spawn and you have to kill them; be careful and they can throw water under you and kill you very quickly. After a couple more waves a 4 bar mob will spawn and upon their death a god orb will spawn; DO NOT kill this mob as that will throw off the whole rotation of god orbs. Instead get the mob down to 1 bar and leave it. After a bit of time has past you will get switched with the people on the inside so now you will be inside the dome and they will be outside dealing with all the adds.
Once inside your job is to DPS the boss as much as you can until a god orb is thrown in. Once the outside people throw a god orb in your dome will get cut in half and a shield will appear on the boss. The Berserker or Kinetic will then need to break the shield as quickly as possible. Once the shield is broken the Berserker or Kinetic will go to the edge of the dome and use their action button to exit the dome and join the other group to help kill the adds outside. You will now be down one person but that doesn’t matter as most of your DPS will come in phase 2. Keep DPS on boss and wait for the next god orb to be thrown inside. Once inside the next damage dealer will take it and do the same thing; break shield and go outside to help kill mobs. Now you will have no DPS other than the minimal you have from the tank and supports. Once the next orb comes in the LightBinder will get it and will immediately turn into either a Berserker or Kinetic and break the shield. Once the shield is broken the LightBinder will have to go outside the dome and turn back into a LightBinder as phase 2 will rely heavily on the LightBinder. You will now be down to only a tank and Alchemist on the inside. There will be no more orbs unless the DPS outside is high enough; if there is another orb you can have it thrown in and given to the Alchemist so he can go outside and help with buffs and shields.
After you get switched with everyone on the outside you will be left to deal with the mobs. We found that the easiest thing to do is to run around and avoid the mobs as you will have to survive till the god orb spawns and throw it in. Once you have thrown the god orb in your only job is to die and you might be resurrected in phase 2 but if there are damage dealers dead you will get last priority.
NOTE: Don’t get kicked for inactivity while dead.
Phase 2
This is the most boring part of any distortion so far. It is a rinse and repeat and rely’s heavily on your LightBinder paying attention and being able to count to 3 or 6. During this phase the dome is gone and everyone focuses on the boss and there are no adds to deal with. In this phase there will be a god orb that spawns at the start of the phase. Let the person that got the first orb of the fight get this one. DO NOT use the caster god ultimate as it will mess up the timer for the LightBinder and makes it very difficult to time when to use Blessing of Tenacity. The only thing that you will have to worry about in this faze is his screech. When he does his screech everyone except the tank will need to be stacked on the LightBinder to be cleansed from his pull in. If not stacked on the LightBinder the boss will pull you in and will hit you for about 1% or your health this will go for 9 seconds (will not proc pally symbol). Being pulled in too many times will wipe your team and you will have to start all over again. Let the LightBinder focus and don’t get mad if they miss a couple as the time at which to cast Blessing of Tenacity varies from time to time. If you make it to the second phase without anyone dying you are doing well and are on track to beat the boss.
NOTE: Terminal will stop you from getting hurt for about 4 ticks but will not stop the pull in.
Roles and Responsibilities:
- Tank’s
-
Group 1
- The tank for group one is going to be the main tank when there is no dome so it is very important to have your best tank on the inside group first. The role for the tank is really easy when you are inside the dome. Just keep aggro and when the boss does a spinning move you can either reflect it or move out of it so he stops. On the outside you have to make sure you grab all the adds and avoid the Ong’s when they spin. Once you have passed the first phase make sure you are keeping the boss off water and keeping aggro from the other people.
-
Group 2
- For the inside portion of this fight just keep aggro and either reflect his spin move or move out of him. While on the outside make sure you are picking up all the mobs and make sure to avoid the Ong’s. The tank for group 2 has the easiest job during the second phase. Your job is to die plain and simple. If nobody is dead your team may decide to rez you but don’t count on it since you will be fighting with the other tank for aggro and that can cause problems.
-
- Alchemist’s
- The alchemist’s have an easy job in this fight. If you are on the outside of the dome make sure you are putting shields on the tank as he will be taking a lot of damage. Make sure you are saving your buffs for the god orb as it will be very crucial to get that shield down. After the dome is down make sure you are standing on the LightBinder so you don’t get pulled in. Right after he is done with his “screech” put a shield on the tank so he won’t take a lot of damage when he is pulled in.
- Damage
- The damage dealers only job is to break the shield and kill the 4 bar when it comes up. Other than that, do your rotations right after you get up from the pull in as that will give you the most up time on buffs and will max DPS.
- LightBinder
- This fight is the most important part of all the A level distortions for a LightBinder. Your job consists of making sure you break the shield and get out of the dome and change back to LightBinder all before the god mode is over. For phase 2 the boss will do a “screech” like the boss in A:2 does but this time it is much more deadly to your team and if you miss time your Blessing of Tenacity too many times you will wipe the team. 4-5 seconds after every screech he will pull your team in; this means that you will count to 3 and use Blessing of Tenacity. NOTE: Every third “screech” is going to be longer before he pulls you in; wait for 5-6 seconds before using Blessing of Tenacity. This fight is very hard your first couple times getting used to when to use Blessing of Tenacity but once you get the hang of it you will be able to do it easily every time.
Skills and Talents:
NOTE: Only recommended classes are shown.
~~~~~~~~~~~~~~~~~~~~~~~~~~~~~~~~~~~~~~~~~~~~~~~~~~~~~~~~~~~~~~~~~~~~~~~~~~~~~~~~~~~~~~~~~~
Knight

~~~~~~~~~~~~~~~~~~~~~~~~~~~~~~~~~~~~~~~~~~~~~~~~~~~~~~~~~~~~~~~~~~~~~~~~~~~~~~~~~~~~~~~~~~
Kinetic

~~~~~~~~~~~~~~~~~~~~~~~~~~~~~~~~~~~~~~~~~~~~~~~~~~~~~~~~~~~~~~~~~~~~~~~~~~~~~~~~~~~~~~~~~~
Berserker

~~~~~~~~~~~~~~~~~~~~~~~~~~~~~~~~~~~~~~~~~~~~~~~~~~~~~~~~~~~~~~~~~~~~~~~~~~~~~~~~~~~~~~~~~~
LightBinder

~~~~~~~~~~~~~~~~~~~~~~~~~~~~~~~~~~~~~~~~~~~~~~~~~~~~~~~~~~~~~~~~~~~~~~~~~~~~~~~~~~~~~~~~~~
Alchemist

~~~~~~~~~~~~~~~~~~~~~~~~~~~~~~~~~~~~~~~~~~~~~~~~~~~~~~~~~~~~~~~~~~~~~~~~~~~~~~~~~~~~~~~~~~
Recommended Gear Stats:
NOTE: Main-Hand weapons are much more valuable to have than Off-Hand weapons.
- Knight
- Main-Hand: Cutting Grass increase
- Off-Hand: Barrier II buff increase
- Kinetic
- Main-Hand: Sledgehammer damage increase
- Off-Hand: Ultimate cooldown reduction
- Berserker
- Main-Hand: Fracture Damage increase
- Off-Hand: Battlefrenzy cooldown reduction
- LightBinder
- Main-Hand: Damage buff duration increase
- Off-Hand:Halo damage reduction
- Alchemist
- Main-Hand: Stimulant cooldown reduction
- Off-Hand: Terminal cooldown reduction
Map and Important Pictures:
~~~~~~~~~~~~~~~~~~~~~~~~~~~~~~~~~~~~~~~~~~~~~~~~~~~~~~~~~~~~~~~~~~~~~~~~~~~~~~~~~~~~~~~~~~
Map

~~~~~~~~~~~~~~~~~~~~~~~~~~~~~~~~~~~~~~~~~~~~~~~~~~~~~~~~~~~~~~~~~~~~~~~~~~~~~~~~~~~~~~~~~~
Portals


~~~~~~~~~~~~~~~~~~~~~~~~~~~~~~~~~~~~~~~~~~~~~~~~~~~~~~~~~~~~~~~~~~~~~~~~~~~~~~~~~~~~~~~~~~
Dome

~~~~~~~~~~~~~~~~~~~~~~~~~~~~~~~~~~~~~~~~~~~~~~~~~~~~~~~~~~~~~~~~~~~~~~~~~~~~~~~~~~~~~~~~~~
Rewards:
All distortions upon completion will give Main and Off-hand epic quality gear.
Proficiency:
- Low: 4692
- High: 5109
Prestige:
- Low: 3015
- High: 3207